A. DISABLE INDEXING SERVICES
Indexing Services is a small little program that uses large amounts of RAM and can often make a computer endlessly loud and noisy. This system process indexes and updates lists of all the files that are on your computer. It does this so that when you do a search for something on your computer, it will search faster by scanning the index lists. If you don’t search your computer often, or even if you do search often, this system service is completely unnecessary. To disable do the following:
1. Go to Start
2. Click Settings
3. Click Control Panel
4. Double-click Add/Remove Programs
5. Click the Add/Remove Window Components
6. Uncheck the Indexing services
7. Click Next
B. OPTIMISE DISPLAY SETTINGS
Windows XP can look sexy but displaying all the visual items can waste system resources. To optimise:
1.Go to Start
2. Click Settings
3. Click Control Panel
4. Click System
5. Click Advanced tab
6. In the Performance tab click Settings
7. Leave only the following ticked:
- Show shadows under menus
- Show shadows under mouse pointer
- Show translucent selection rectangle
- Use drop shadows for icons labels on the desktop
- Use visual styles on windows and buttons
C. SPEEDUP FOLDER BROWSING
You may have noticed that everytime you open my computer to browse folders that there is a slight delay. This is because Windows XP automatically searches for network files and printers everytime you open Windows Explorer. To fix this and to increase browsing significantly:
1. Open My Computer
2. Click on Tools menu
3. Click on Folder Options
4. Click on the View tab.
5. Uncheck the Automatically search for network folders and printers check box
6. Click Apply
7. Click Ok
8. Reboot your computer
PROVE MEMORY USAGE
Cacheman Improves the performance of your computer by optimizing the disk cache, memory and a number of other settings.
NOTE: This program is shareware and some features require activation.
Once Installed:
1.Go to Show Wizard and select All
2.Run all the wizards by selecting Next or Finished until you are back to the main menu. Use the defaults unless you know exactly what you are doing.
3.Exit and Save Cacheman
4.Restart Windows
E. OPTIMISE YOUR INTERNET CONNECTION
There are lots of ways to do this but by far the easiest is to run
TCP/IP Optimizer.
1. Download and install
2. Click the General Settings tab and select your Connection Speed (Kbps)
3. Click Network Adapter and choose the interface you use to connect to the Internet
4. Check Optimal Settings then Apply
5. Reboot
F. OPTIMISE YOUR PAGEFILE
If you give your pagefile a fixed size it saves the operating system from needing to resize the page file.
1. Right click on My Computer and select Properties
2. Select the Advanced tab
3. Under Performance choose the Settings button
4. Select the Advanced tab again and under Virtual Memory select Change
5. Highlight the drive containing your page file and make the initial Size of the file the same as the Maximum Size of the file.
Windows XP sizes the page file to about 1.5X the amount of actual physical memory by default. While this is good for systems with smaller amounts of memory (under 512MB) it is unlikely that a typical XP desktop system will ever need 1.5 X 512MB or more of virtual memory. If you have less than 512MB of memory, leave the page file at its default size. If you have 512MB or more, change the ratio to 1:1 page file size to physical memory size.
G. SPEEDUP FOLDER ACCESS - DISABLE LAST ACCESS UPDATE
If you have a lot of folders and subdirectories on your computer, when you access a directory XP wastes a lot of time updating the time stamp showing the last access time for that directory and for ALL sub directories. To stop XP doing this
you need to edit the registry. If you are uncomfortable doing this then please do not attempt.
1. Go to Start and then Run and type “regedit”
2. Click through the file system until you get to “HKEY_LOCAL_MACHINE\ System\CurrentControlSet\Control\FileSystem”
3. Right-click in a blank area of the window on the right and select ‘DWORD Value’
4. Create a new DWORD Value called ‘NtfsDisableLastAccessUpdate’
5. Then Right click on the new value and select ‘Modify’
6. Change the Value Data to ‘1′
7. Click ‘OK’
H. MAKE YOUR MENUS LOAD FASTER
This is one of my favourite tweaks as it makes a huge difference to how fast your machine will ‘feel’. What this tweak does is remove the slight delay between clicking on a menu and XP displaying the menu.
1. Go to Start then Run
2. Type ‘Regedit’ then click ‘Ok’
3. Find “HKEY_CURRENT_USER\Control Panel\Desktop\”
4. Select “MenuShowDelay”
5. Right click and select “Modify’
6. Reduce the number to around “100″
7. This is the delay time before a menu is opened. You can set it to “0″ but it can make windows really hard to use as menus will open if you just look at them - well move your mouse over them anyway. I tend to go for anywhere between 50-150 depending on my mood
I. IMPROVE XP SHUTDOWN SPEED
This tweak reduces the time XP waits before automatically closing any running programs when you give it the command to shutdown.
1. Go to Start then select Run
2. Type ‘Regedit’ and click ok
3. Find ‘HKEY_CURRENT_USER\ Control Panel\Desktop\’
4. Select ‘WaitToKillAppTimeout’
5. Right click and select ‘Modify’
6. Change the value to ‘1000′
7. Click ‘OK’
8. Now select ‘HungAppTimeout’
9. Right click and select ‘Modify’
10. Change the value to ‘1000′
11. Click ‘OK’
12. Now find ‘HKEY_USERS\ .DEFAULT\Control Panel\Desktop’
13. Select ‘WaitToKillAppTimeout’
14. Right click and select ‘Modify’
15. Change the value to ‘1000′
16. Click ‘OK’
17. Now find ‘HKEY_LOCAL_MACHINE\ System\CurrentControlSet\Control\’
18. Select ‘WaitToKillServiceTimeout’
19. Right click and select ‘Modify’
20. Change the value to ‘1000′
21. Click ‘OK’
J. IMPROVE SWAPFILE PERFORMANCE
If you have more than 256MB of RAM this tweak will considerably improve your performance. It basically makes sure that your PC uses every last drop of memory (faster than swap file) before it starts using the swap file.
1. Go to Start then Run
2. Type “msconfig.exe” then ok
3. Click on the System.ini tab
4. Expand the 386enh tab by clicking on the plus sign
5. Click on new then in the blank box type”ConservativeSwapfileUsage=1″
6. Click OK
7. Restart PC
K. ENSURE XP IS USING DMA MODE
XP enables DMA for Hard-Drives and CD-Roms by default on most ATA or ATAPI (IDE) devices. However, sometimes computers switch to PIO mode which is slower for data transfer - a typical reason is because of a virus. To ensure that your machine is using DMA:
1. Open ‘Device Manager’
2. Double-click ‘IDE ATA/ATAPI Controllers’
3. Right-click ‘Primary Channel’ and select ‘Properties’ and then ‘Advanced Settings’
4. In the ‘Current Transfer Mode’ drop-down box, select ‘DMA if Available’ if the current setting is ‘PIO Only’


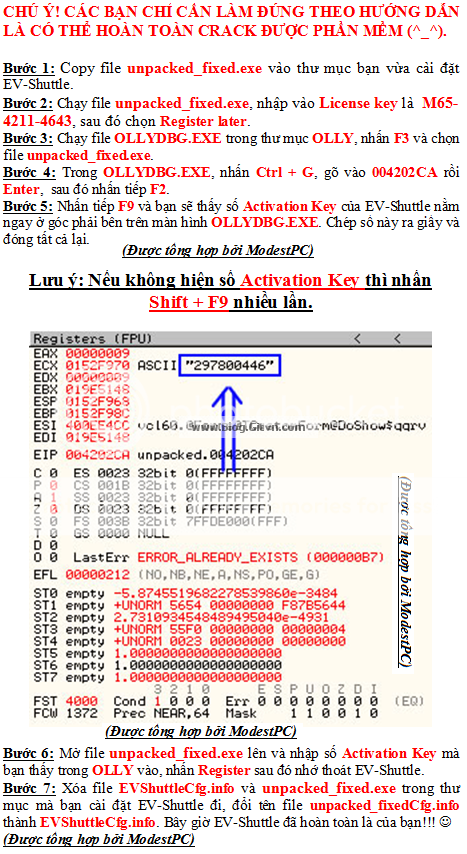
 Hướng dẫn crack EvShuttle 4.0 thành công 100%